Today, the development of distributed systems has become an increasingly essential need. However, due to the complexity of these systems, developing and managing such applications presents challenges for us developers. Matters like communication between services and state management are not easy tasks. This is where Dapr (Distributed Application Runtime) comes into play, assisting us developers.
Dapr is a platform designed to make developing distributed applications easier and faster. With its provided features, we can perform tasks like communication between services, state management, and event publishing/listening more effortlessly. It even simplifies actor programming.
Dapr runs as a sidecar attached to applications. By adding a Dapr sidecar to each service, we enable these services to access the features provided by Dapr. This allows us to easily integrate existing applications with Dapr and create distributed applications without rewriting the same things.
Dapr consists of modules called "building blocks." These modules are used for different tasks. For example, Service Invocation facilitates making calls between different services, while State Store manages the state of our applications. Pub Sub simplifies event publishing and subscription management, and Actor enables actor-based programming.
Dapr offers a language-independent API, meaning we can work seamlessly with our preferred language and technology. Additionally, SDKs are available for different languages, further streamlining our work.
In this article, we will take a closer look at how to use Dapr's fantastic features through an example scenario. If you're ready, let's get started!
Dapr CLI Installation
You need to install the Dapr CLI from the following link.
https://docs.dapr.io/getting-started/install-dapr-cli/
We should prepare Dapr using the following command line.
dapr init
When you execute the following command, you should see the CLI Version and Runtime Version values if the process has been successfully completed.
dapr -v
Example Scenario
In our example scenario, we have three different services: Credit Card Service, Limit Control Service, and Statement Service.
Credit Card Service provides users with the ability to create credit cards and make payments using them. Users can submit requests to create a credit card and make payments with their existing credit cards through the Credit Card Service.
Limit Control Service offers information about the maximum limit users can request for their credit cards. When the Credit Card Service receives a request to create a credit card, it makes a call to the Limit Control Service to determine how much limit the user can request.
Statement Service enables the generation of credit card statements at specific intervals. This service operates periodically to prepare credit card statements and delivers them to customers via email.
Building Blocks
State Store
State Store is one of the fundamental building blocks provided by Dapr and is used for state management. It offers a convenient structure for storing data. In the Limit Control Service, we can use the State Store to store user's maximum credit card limit information.
First, we need to create a component YAML file for the state store. To do this, let's create a folder called "resources" in the solution's root directory and inside it, create a file named "statestore_redis.yml".
In the metadata section, we specify the name of the resource as the "name" field. Let's set it as "statestore_redis." We will use this resource name when communicating with DaprClient.
In the spec section, we indicate which component we will use for state management in the "type" field. You can use many components like MongoDB, PostgreSQL, and others. You can find a list of components at the following link. Let's set it as "state.redis."
https://docs.dapr.io/reference/components-reference/supported-state-stores/
In the "spec metadata" section, we provide the information that the component requires. You can find detailed information at the following link. For our example scenario, host and password information should be sufficient.
https://docs.dapr.io/reference/components-reference/supported-state-stores/setup-redis/
To use Dapr services with the .NET SDK in your Limit Control Service project, you can install the required packages. Here are the packages you can install:
    dotnet add package Dapr.AspNetCore -v 1.11.0
dotnet add package Dapr.Client -v 1.11.0
To register the DaprClient, you should use AddDaprClient. Dapr will automatically read the HTTP and gRPC connection information for the sidecar from the environment, saving us from manual configuration hassles. You can also opt for the HTTP call method instead of the .NET SDK if you prefer.
builder.Services.AddDaprClient();
There are two endpoints, one for querying the limit information based on the identity number and another for updating the maximum limit information.
In the Get method, we use GetStateAsync, while in the Post method, we use GetStateEntryAsync. Both methods return the state; however, GetStateEntryAsync also returns an Etag, ensuring consistency. If there have been changes to the state since the retrieval, the operation will fail. Therefore, it provides a form of consistency.
In cases where consistency is crucial, it's important to choose a component that supports Etag. You can find a list of components supporting Etag at the link I mentioned earlier.
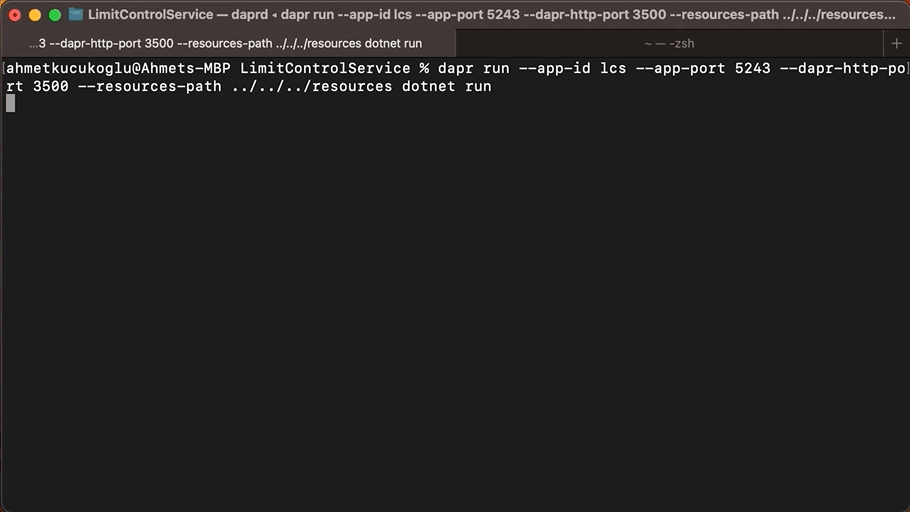
When you run the following command in the LimitControlService project directory, both the application and the Dapr sidecar will start.
dapr run --app-id lcs --app-port 5243 --dapr-http-port 3500 --resources-path ../../../resources dotnet run
appPort specifies the port that the application listens on, while daprHttpPort specifies the HTTP port that Dapr will listen on. This is essentially the port for the Dapr sidecar project. If you prefer to use gRPC, you can use the daprGrpcPort option. You can find a detailed list of options at the following link.
https://docs.dapr.io/reference/cli/dapr-run/
curl -X POST http://localhost:5243/api/67787788378/decrease -H 'Content-Type: application/json' -d '{"limit":15000}'
Service Invocation
The fundamental purpose of microservices is to manage functionality by breaking it into separate services and enabling communication between these services. Service Invocation is one of the most critical features provided by Dapr and is used for making calls between services. In the Credit Card Service, when we receive a request to create a user's credit card, we can use the Service Invocation building block to make a call to the Limit Control Service. This allows us to quickly retrieve the maximum limit that the user can request.
Just as we did in the Limit Control Service project, let's also install the above-mentioned packages and register the DaprClient in the Credit Card Service project.
The endpoint for creating a credit card will look as follows:
We can make requests to another service using the InvokeMethodAsync method. By specifying "lcs" as the appId, we are sending a request to the Limit Control Service application. The methodName represents the endpoint of the API being called.
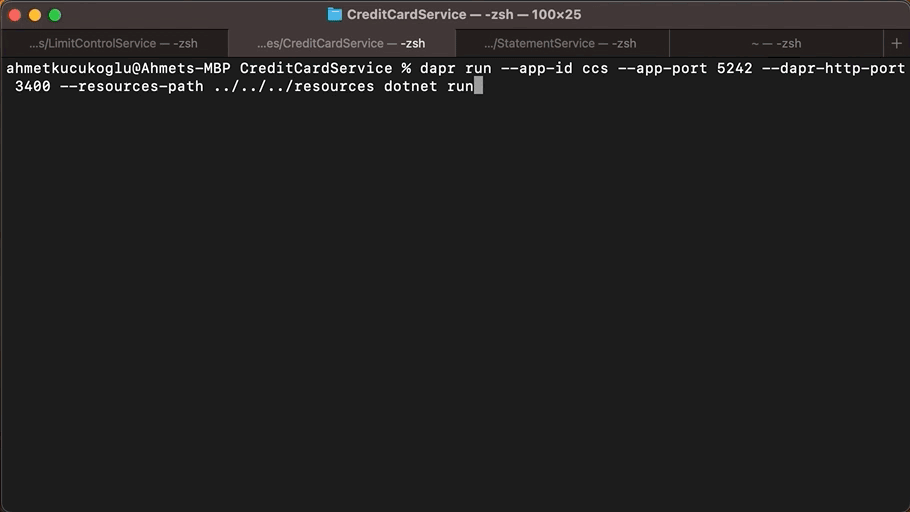
When you run the following command in the CreditCardService project directory, both the application and the Dapr sidecar will start:
dapr run --app-id ccs --app-port 5242 --dapr-http-port 3400 --resources-path ../../../resources dotnet run
curl -X POST http://localhost:5242/api -H 'Content-Type: application/json' -d '{"identityNumber":"67787788378", "fullName":"Ahmet KÜÇÜKOĞLU", "limit":15000}'
Actor
Tracking and ensuring the security of credit card transactions can increase the complexity of microservices. Dapr's Actor building block provides significant convenience in scenarios like these. In the Credit Card Service, by creating an Actor for each credit card, we can manage credit card transactions from a single point. This allows us to carry out the user's transactions between different services consistently and securely. I recommend checking out the Orleans article series for more information on Actor programming.
To use Dapr's Actor services in the Credit Card Service project, you can install the required packages. Here are the packages you can install.
    dotnet add package Dapr.Actors -v 1.11.0
dotnet add package Dapr.Actors.AspNetCore -v 1.11.0
First, let's define the behaviors for the CreditCard and CreditCards actors.
We can create the CreditCard actor as follows. I'm omitting the methods other than Create to keep the article concise. You can refer to the GitHub repository for the complete implementation.
We can store the actor's state using the StateManager.SetStateAsync method. One of the most important features of actors is their support for transactional operations. This means that if you call the SetStateAsync method multiple times, all these changes will be saved as a whole at the end. We've seen another advantage of Dapr.
In order to utilize the state store feature within an Actor, the state store component must support both Transactional and ETag capabilities. We had previously opted for Redis, and since Redis supports these features, we can continue using the same component. Alternatively, if you prefer, you can create a different component. To enable the utilization of the state store in Actors, it is necessary to append the following metadata to the 'statestore_redis.yml' file.
      - name: actorStateStore
    value: "true"
Later, we register the actors as follows.
    builder.Services.AddActors(options =>
{
    options.Actors.RegisterActor<CreditCards>();
    options.Actors.RegisterActor<CreditCard>();
});
Finally, we activate the necessary middleware for actors as shown below.
app.MapActorsHandlers();
You can run our application with the following command line.
dapr run --app-id ccs --app-port 5242 --dapr-http-port 3400 --resources-path ../../../resources dotnet run
curl -X POST http://localhost:5242/api/4263982640269299/pay -H 'Content-Type: application/json' -d '{"amount":1000, "vendor":"Microsoft Azure"}'
curl http://localhost:5242/api/4263982640269299/transactions/072023 -H 'Content-Type: application/json'

Cron - Output Binding
Scheduled tasks are an essential requirement for many applications, simplifying the execution of processes that need to run at specific time intervals. The Cron building block is a feature provided by Dapr for managing time-based tasks. In the Statement Service, we can use the Cron building block to generate credit card statements at specific times. This allows us to automatically create statements at regular intervals and deliver them to customers on time.
First, we need to create a component YAML file for Cron. To do this, let's create a file named "binding_cron.yml" in the "resources" folder within the solution's root directory.
In the metadata name section, we specify the name of the resource. Let's set it as "issue-statements," which should match the endpoint in the relevant service. According to the file, a POST request will be made to the "issue-statements" endpoint every 30 minutes. You can find detailed information on what to provide as the schedule value at the following link.
https://docs.dapr.io/reference/components-reference/supported-bindings/cron/
The endpoint triggered by Cron will look like the following.
Let's install the following packages in the Statement Service project.
    dotnet add package Dapr.Client -v 1.11.0
dotnet add package Dapr.AspNetCore -v 1.11.0
Let's register the DaprClient with the following line.
builder.Services.AddDaprClient();
Pub Sub
Event-based communication between microservices is a common approach to increase system flexibility and reduce fragility. Pub/Sub is a significant building block in Dapr that facilitates event-based communication. In the Statement Service, we can use the Pub/Sub building block to automatically generate credit card statements. After receiving the credit cards from the Credit Card Service, we can place them in a queue to ensure the sequential creation of statements.
When the Cron endpoint is triggered, let's fetch the credit cards and enqueue them one by one. For this, we need to create a Pub/Sub component YAML file. To do this, let's create a file named "pubsub_rabbitmq.yml" in the "resources" folder within the solution's root directory.
In the metadata name section, we specify the name of the resource. Let's set it as "pubsub_rabbitmq."
In the spec.type section, we specify which component to use for Pub/Sub. You can use various components like Kafka, RabbitMQ, and others. You can find a list of components at the following link. Let's set it as "pubsub.rabbitmq."
https://docs.dapr.io/reference/components-reference/supported-pubsub/
In the spec metadata section, we provide the information that the component requires. For our example scenario, the connectionString information is sufficient. You can find detailed information at the following link.
https://docs.dapr.io/reference/components-reference/supported-pubsub/setup-rabbitmq/
The endpoint triggered by Cron and the endpoint listening to the queue will look like the following.
We can send our message to the queue using the PublishEventAsync method. We provide the resource's name for pubsubName and the queue's name for topicName.
To receive messages, we need to create an endpoint and add the Topic attribute. That's all we need.
We also need to activate the following middlewares.
    app.UseCloudEvents();
app.MapSubscribeHandler();
Dapr supports the CloudEvents for the event message standard, allowing for easy interoperability between pub/sub components. MapSubscribeHandler adds the necessary handlers to subscribe to a topic.
You can run our application with the following command line.
dapr run --app-id css --app-port 5244 --dapr-http-port 3600 --resources-path ../../../resources dotnet run
curl -X POST http://localhost:5244/issue-statements
Workflow
Managing and coordinating workflows composed of a series of steps is crucial for microservices in terms of handling complexity. Dapr's Workflow building block simplifies the orchestration and tracking of such processes. In the Statement Service, we can leverage the Workflow building block to govern the statement generation process, ensuring its efficient and error-free execution.
For the Workflow component, you don't need to create a YAML file. You can use the default Workflow component named "dapr."
In Workflow, each step is referred to as an "activity." Let's create activities for fetching credit card transactions as "GetTransactionsActivity," generating the statement as "IssueStatementActivity," and sending email notifications as "SendEmailNotificationActivity."
First, we need to install the following package in the Statement Service project.
dotnet add package Dapr.Workflow -v 1.11.0
The first activity, "GetTransactionActivity," will look like the following.
Each activity has an input and an output. The input is sent by the workflow, as we will see shortly. In this activity, it takes the credit card number and statement period as input and returns the account transactions as output.
The second activity, "IssueStatementActivity," will look like the following.
The third and final activity, "SendEmailNotificationActivity," will look like the following.
The workflow that orchestrates these three activities will look like the following.
Workflows, like activities, also have inputs and outputs. Here, the input is the credit card number and statement period information. You can use the SetCustomStatus method to record the steps within the workflow.
We configure the endpoint listening to the queue as follows.
We specify "dapr" for the workflowComponent, as mentioned earlier, this is Dapr's default component. Let's not forget that Workflow is still in the alpha stage.
The instanceId is important as it is used to track everything that has happened within the Workflow, allowing you to follow its history. This instanceId is also used for querying Workflow history. With this ID, you can perform queries or even stop and replay the Workflow. It's a valuable feature for managing and debugging workflows.
We need to register the Workflow and activities as follows.
    builder.Services.AddDaprWorkflow(options =>
{
    options.RegisterWorkflow<IssueStatementWorkflow>();

    options.RegisterActivity<GetTransactionsActivity>();
    options.RegisterActivity<IssueStatementActivity>();
    options.RegisterActivity<SendEmailNotificationActivity>();
});
You can run our application with the following command.
dapr run --app-id css --app-port 5244 --dapr-http-port 3600 --resources-path ../../../resources dotnet run
curl -X POST http://localhost:5244/issue-statements
SendGrid - Input Binding
Email notifications are an important tool for informing and communicating with users. In Statement Service, when a statement is generated, we can use the SendGrid building block to send the statement amount information to the cardholder via email. With the SendGrid building block, we can easily integrate email notifications and establish effective communication with our users. Alternatively, you can choose to use the SMTP building block.
To do this, we need to create another component yml file. Let's create a file named "bindings_sendgrid.yml" in the "resources" folder in the root directory of the solution.
In the metadata section, we specify the name for the resource. Let's set it as "bindings_sendgrid." You can find detailed metadata information at the following address.
https://docs.dapr.io/reference/components-reference/supported-bindings/sendgrid/
We can configure the third activity as follows.
Resiliency
The complexity of microservices can strain system resilience. Dapr helps services deal with unwanted circumstances through resiliency solutions. For instance, the Circuit Breaker pattern monitors errors that can occur in requests to services and intervenes in case of overloads, preventing services from crashing. The Retry Policy pattern automatically retries requests to services when temporary errors occur. With Dapr, we can make systems more reliable by building resilience against potential communication errors between services, ensuring they operate more reliably.
To achieve this, it's sufficient to create a YAML file under the "resources" directory.
In this example, we defined two resiliency policies: one is the retry policy, and the other is the circuit breaker policy.
We named the retry policy "simpleRetry" and configured it to retry a failed request up to 3 times with a 5-second delay between retries. Additionally, we named the circuit breaker policy "simpleCb." In this policy, after three consecutive failures, it transitions the circuit to a half-open state, stays in that state for 5 seconds, and then allows a request to determine whether the issue has been resolved or not.
In the "targets" section, we specified that the "simpleRetry" and "simpleCb" policies should be applied to the Limit Control Service (lcs) application.
Observability
In microservices architecture, monitoring services, detecting errors, and analyzing performance are essential tasks. Dapr provides three features for observability:
Logging: Dapr collects logs such as incoming requests to services, responses from services, and error messages that occur within services. If our application is running on Kubernetes, we can easily send these logs to the desired destination using log collectors.
Metrics: Dapr collects various metrics to monitor the performance of services, including CPU usage, memory usage, and network traffic. It provides a Prometheus metric endpoint for each application, allowing us to export metrics to Prometheus and monitor them with Grafana.
Tracing: Dapr collects tracing data to analyze services and components, supporting protocols like Zipkin and OpenTelemetry. Since OpenTelemetry is an industry standard, we can export all tracing data to our preferred monitoring tool, whether it's Zipkin, Jaeger, New Relic, or others.
Dapr supports Zipkin by default for tracing. We need to configure dapr to send tracing data to zipkin. Let's create a folder named "dapr" in the project main solution and add a file named "config.yml" in it.
In spec.tracing.zipkin.endpointAddress, we specify the Zipkin address.
To enable the configuration, we add the config option when running the application.
dapr run --app-id css --app-port 5244 --dapr-http-port 3600 --resources-path ../../../resources --config ../../../dapr/config.yml dotnet run
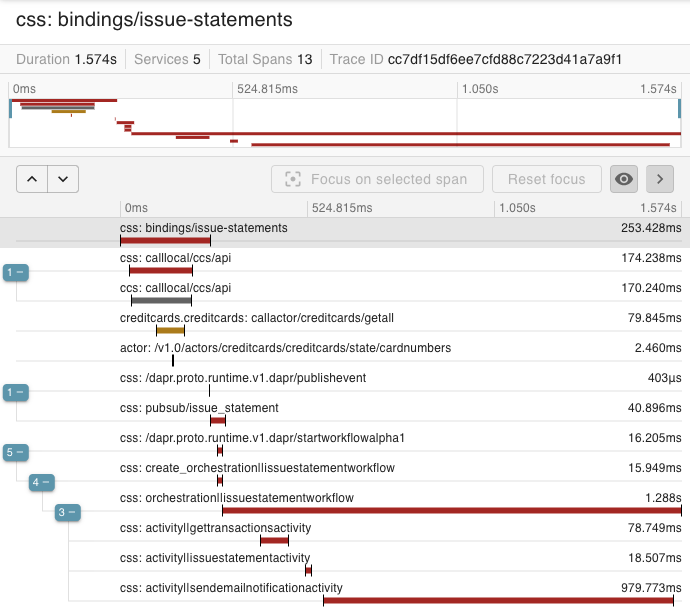
In the example above, you can see all the tracing data in detail after the cron is triggered.
Run Multiple Applications
You can start all applications with a single CLI command instead of running each application individually. To do this, you need to create a YAML file. You can create a file named "apps.yml" in the root directory of your solution.
You can access the other options through the following link.
When you run the following command in the solution's root directory, all your applications will be up and running.
dapr run -f apps.yml
You can stop the applications using the following command.
dapr stop -f path/apps.yml
Dockerize Applications
To dockerize our application, we just need to prepare docker-compose.yml as following.
Placement is dapr's own service. It is responsible for keeping the locations of dapr actors in the hash table.
At the beginning of the article, I said that we enable services to access dapr features by adding a sidecar next to each service. As seen in Docker compose, we add a sidecar (lcs-dapr, ccs-dapr, css-dapr) for each service (lcs, ccs, css).
In Summary
In this article, we've explored the powerful building blocks of Dapr that simplify communication and data management in microservices architecture. Dapr's flexible and open-source nature provides developers with the freedom to customize and tailor their projects to meet specific requirements. It also reduces code duplication and accelerates development processes in projects utilizing microservices architecture. With Dapr, we can efficiently manage business processes, making our systems more flexible and scalable.
You can access the sample project from my Github address.
Good luck.
Leave a comment
Reply to
Cancel reply